Black and White Sheet Cake
I’ve been dreaming of an iteration of this black and white sheet cake since I read my American Girl magazine back in the spring of 2000. It was their 10th birthday and they released a special issue featuring a reader-submitted recipe for a “people pleaser” 9 x 13 cake. So Jennifer L. of Virginia, this one’s for you!! Thanks for the inspiration 🙂
Jennifer’s original recipe called for boxed mix and canned frosting, which is a great starting point. But I’m always looking for a challenge, and converting this into a homemade sheet cake definitely ticked that box.
After some tweaking of both my favorite chocolate and vanilla cake recipes, I’m so happy with the results!! This black and white sheet cake is moist, tender and absolutely delicious. It feeds a nice sized crowd and has the perfect cake/frosting ratio. To quote AG Magazine…
“You simply can’t go wrong with this clever cake idea.”

The prep for this black and white sheet cake is a little more involved than just making a single batter, because we’re making two flavors. Don’t let that scare you, though! By doing a few things before beginning and following my tried and true process, you can streamline this and it won’t be as tedious as you think.
Be sure to use a half sheet pan and not a “cookie sheet” for this recipe. A sheet pan has higher sides and can easily accommodate all the batter.
Mise en Place
This practice belongs in every kitchen, especially when baking. All it means is to have all of your ingredients measured and ready to add as the batter comes together. That way, you aren’t scrambling to measure things as you need them and risking making mistakes.
Thankfully, both the chocolate and vanilla batter comes together the exact same way, with the exact same ingredients up until you add the flour mixture. I’ve included my exact workflow from ingredient prep to the oven. You’ve got this!
Prep & Bake Workflow
- Preheat the oven.
- Butter the sides of the sheet pan and line the bottom with parchment paper. It also helps to swipe a little butter on the bottom of the pan before adding the parchment. This helps it to stay in place better. I also like to draw a line with a non toxic marker (washable ones work great!) down the center of the parchment to help guide me when adding the batters to each side.
- Melt the chocolate for the chocolate batter and set it aside to cool. It’s important that the melted chocolate has had time to cool before you add it to the batter. Melt it before you prep any of the other ingredients so that it has plenty of time.
- Sift each batter’s dry ingredients together. The flour and baking powder measurements are a bit different for each flavor, so pay attention! The chocolate batter has cocoa powder and espresso powder, too. After sifting everything together, give each bowl a whisk and set them aside.
- Set aside the wet ingredients. For both flavors, you have the same amount of eggs, oil, sour cream and milk, so portioning them out should be easier. Add the vanilla extract to each flavor’s measurement of sour cream, since those two ingredients are added to the batter at the same time. There is slightly more vanilla in the vanilla cake batter.
- Grab two large mixing bowls and add the butter and sugar measurements to each one. Again, the butter and sugar are the same for each flavor.
- Beat the butter and sugar for the first flavor for 1-2 minutes. You don’t have to decide which bowl is which flavor at this point. For this step, use a hand mixer to beat on medium low until the butter has mostly coated the sugar and disappeared (first minute). Then, increase the speed and beat for another 30 seconds – 1 minute until just a bit fluffier. You won’t get a paste, it’s going to look like wet sand. Repeat for the other bowl.
- Add the oil to the first bowl and beat on medium high speed for another minute. Repeat for the other bowl.
- Each flavor gets 2 eggs. Work with one bowl at a time, and only move on to the next bowl when both eggs are added to the first bowl. So add one egg to the bowl of your choice, beat it in. Add the second egg to that same bowl and beat it in. Move on and repeat for the other bowl.
- Beat in the sour cream and vanilla extract measurements. Repeat for the other bowl. This is where you need to decide which bowl is vanilla and which bowl is chocolate. The bowl with more vanilla extract will be the vanilla cake batter. I use either a sticky note or a little painter’s tape to keep them straight.
- Alternate adding the dry ingredients with the milk. Just like with the eggs, finish the first bowl of batter completely before moving on to do the second. I recommend finishing the vanilla batter first, and then you won’t need to clean off the beaters before diving right in to finish the chocolate. Add half of the dry ingredients and mix them in on low speed. Stream in the milk and blend it in completely, then add the remaining dry ingredients on LOW speed. Add the melted chocolate to the chocolate batter with the second half of the dry ingredients (cocoa). Mix until there’s a few streaks of dry ingredients left, and then fold each batter a few times by hand to finish.
- Add the chocolate batter to one short side of the prepared baking sheet and the vanilla to the other. These batters are NOT overly runny, they are thicker and flow a bit like lava. This makes them a lot easier to manage. You should be able to empty each bowl on each side and have them stay mostly put.
- Smooth each flavor out carefully to meet in the center of the sheet pan. Again, these batters are very easy to work with. Gently work each flavor from the opposite edges to the center line you drew on the parchment. If the line isn’t perfectly straight or centered, don’t worry! Mine wasn’t perfect even after 5 tests 🙂
- Bake for 10-11 minutes and then rotate the pan. This can get a bit tricky, as the sheet pan is larger and the batter will still be quite jiggly at this point. Go slowly and don’t worry. I include this step because my oven has a hot spot on the left side, but if your oven does a good job of heating evenly, feel free to skip this step!
- Bake for another 10-11 minutes. You might notice that the chocolate rises a bit more than the vanilla. This is normal and okay! The cocoa powder is responsible for that. As the cake cools, it will even out nearly perfectly.
- Let the cake cool completely before frosting it.
Make the frosting
The easiest part of this black and white sheet cake aside from actually eating it 🙂 The chocolate frosting is slightly more work than the vanilla, but worth it. Wait until the cake has cooled completely before starting the frosting. To save on dishes, make the vanilla first, and then the chocolate, scraping the bowl in between flavors.
The vanilla is a small batch of simple American buttercream, made a with powdered sugar, vanilla, heavy cream and a little salt. I recommend using a hand mixer to make both flavors of frosting, since a stand mixer might have trouble mixing such a small batch well enough.
After making the vanilla, scrape out the bowl and beaters really well and then continue to make the chocolate frosting. Save yourself some dishes!
To make the chocolate frosting, you need all of the ingredients you did for the vanilla, just with some cocoa powder. Use a little more heavy cream to balance out the extra dryness from the cocoa, and be sure not to over beat either flavor. Too much mixing will create unnecessary air bubbles in the frosting.
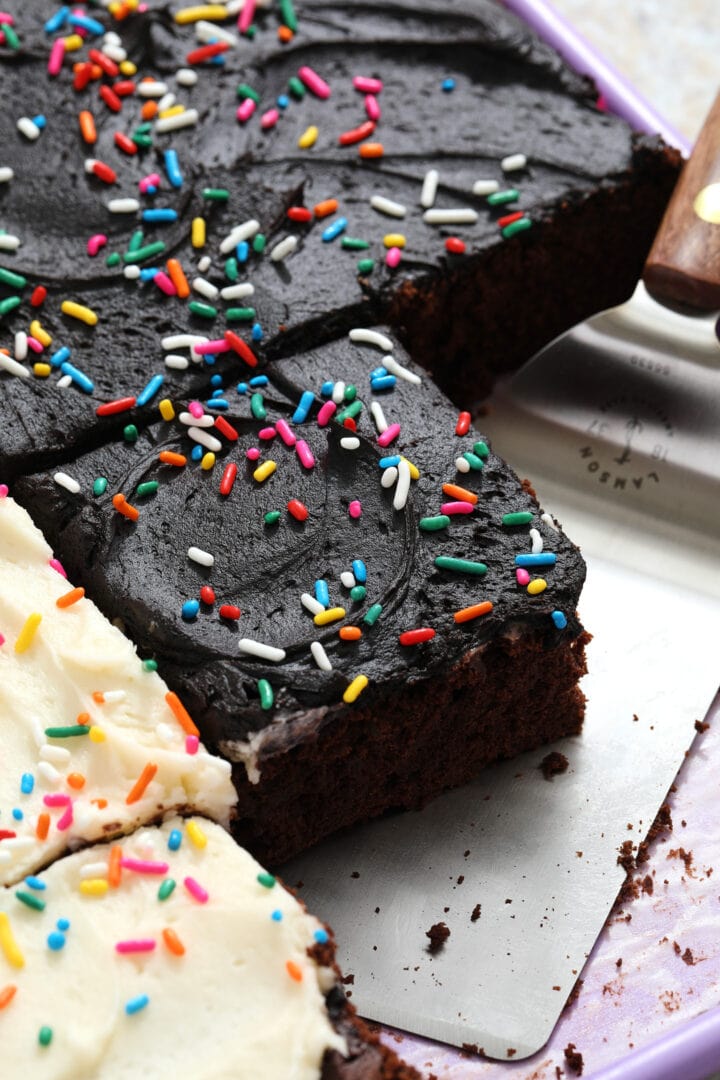
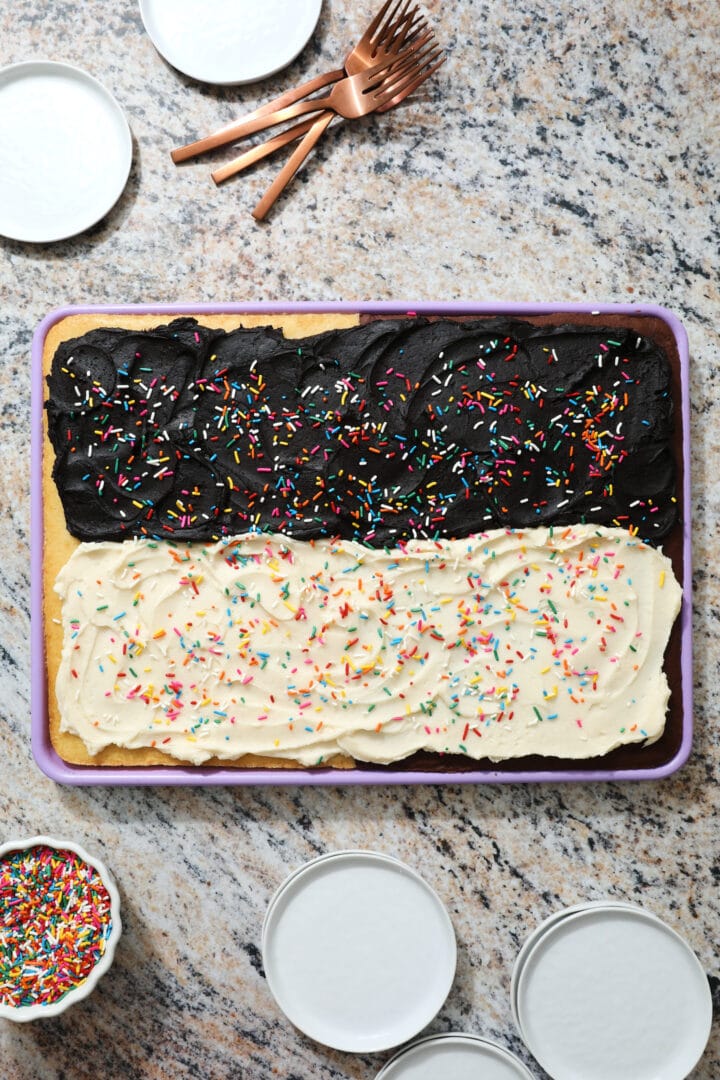
Finishing the cake
Do you remember in grade school when you folded papers in half either like a “hot dog” or a “hamburger?” We baked the cake batter with the flavors splitting the pan in half like a “hamburger” or two wider sides. Now, we’re using both batches of frosting to split the cake on the long sides like a “hot dog” and create 4 different cake and frosting combinations.
When it’s all over, you’ll have the perfect sheet cake for serving larger crowds and picky eaters!
Print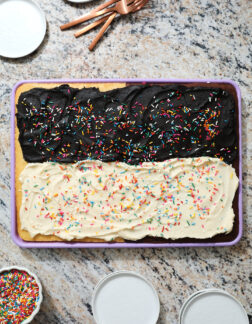
Black and White Sheet Cake
- Prep Time: 50 minutes
- Cooling Time: 4 hours (min)
- Cook Time: 20 minutes
- Total Time: 5 hours + 20 minutes
- Yield: 20 squares 1x
- Category: Dessert, Cake & Cheesecake
- Method: Oven
- Cuisine: American
Description
This sheet cake is the perfect crowd pleasing bake!
Ingredients
For the chocolate batter:
- 3 oz semi sweet or dark chocolate, chopped
- 1 1/4 cup all purpose flour
- 1/2 cup cocoa powder
- 2 tsp baking powder
- 1/2 tsp salt
- 1/2 tsp espresso powder
- 1/4 cup unsalted butter, room temperature
- 1 cup granulated sugar
- 1/3 cup vegetable or canola oil
- 2 large eggs, room temperature
- 1/2 cup sour cream, room temperature
- 1/2 tsp vanilla extract
- 1/2 cup whole milk, room temperature
For the vanilla batter:
- 1 1/2 cups all purpose flour
- 2 tsp baking powder
- 1/2 tsp salt
- 1/4 cup unsalted butter, room temperature
- 1 cup granulated sugar
- 1/3 cup vegetable or canola oil
- 2 large eggs, room temperature
- 1/2 cup sour cream, room temperature
- 1 1/2 tsp vanilla extract
- 1/2 cup whole milk, room temperature
For the vanilla frosting:
- 1/2 cup unsalted butter, room temperature
- 2 cups powdered sugar, sifted
- 1/2 tsp salt
- 2 tsp vanilla extract
- 2 TB heavy cream
For the chocolate frosting:
- 1/2 cup unsalted butter, room temperature
- 2 cups powdered sugar, sifted
- 2/3 cup cocoa powder
- 1/4 tsp salt
- 1/3 cup heavy cream
- 2 tsp vanilla extract
Instructions
To prep the pan:
- Preheat the oven to 350 degrees F.
- Butter the sides and bottom of a half sheet pan, and line the bottom with parchment paper. The butter on the bottom of the sheet will help the parchment stay in place.
- Use a food safe marker to draw a line down the center of the parchment, between the long sides of the baking sheet. You should have two equal halves that are almost perfect squares. This makes it easier to see where the two batters should meet.
- Set the prepared pan aside.
Melt the chocolate and prep the dry ingredients:
- Add the 3 oz of chopped chocolate to a small, heatproof bowl and microwave on full power for 30 seconds. Carefully remove the bowl from the microwave and stir the chocolate to distribute the heat. Microwave again for another 30 seconds and stir. Finally, heat one more time for 20-25 seconds and stir until melted completely.
- If you need to heat the chocolate again, only do it for 5 second intervals, stirring in between. Set the melted chocolate aside until you need it at the very end.
- For the chocolate batter, sift together the flour, cocoa powder, baking powder, salt and espresso powder into a medium sized mixing bowl. Whisk the sifted dry ingredients and set the bowl aside.
- For the vanilla batter, sift together the flour, baking powder and salt into another medium sized mixing bowl. Whisk the sifted dry ingredients and set the bowl aside.
Make the batter for each cake flavor:
- You will need 2 large mixing bowls and an electric hand mixer. Add 1/4 cup butter to each mixing bowl, followed by 1 cup of sugar. Beat the butter and sugar in the first bowl for 1 1/2 – 2 minutes, or until the mixture looks like wet sand. Repeat for the other bowl.
- Add 1/3 cup of vegetable oil to the bowl (it doesn’t matter which one) and beat for another minute on medium high speed. The mixture should be nearly white and fluffier. Repeat for the other bowl.
- Add one egg to the bowl (it doesn’t matter which one) and beat on medium speed until well blended. Add the second egg to the same bowl and mix until incorporated. Repeat with the other bowl.
- Decide which bowl will have the vanilla batter, and add 1/2 cup sour cream along with 1 1/2 tsp of vanilla extract. Use a sticky note or some colorful tape to keep the bowls clearly marked. Beat in the sour cream and vanilla for about 10 seconds until well blended.
- Repeat step 4 with the chocolate batter, adding 1/2 cup sour cream and only 1/2 tsp vanilla extract. Beat until well blended.
- Finish the vanilla cake batter first, so that you won’t need to wash the beaters before jumping right in to the chocolate batter. Add 1/2 of the dry ingredients (without the cocoa powder) and mix on medium low speed until incorporated.
- Stream 1/2 cup of whole milk into the vanilla batter and mix until incorporated. Follow with the remaining dry ingredients (without the cocoa powder) and decrease the speed to low until the flour is mostly mixed in. Stop the mixer and use a spatula to fold the vanilla batter a few times and gently finish mixing.
- Set the vanilla batter aside while you move on to finish the chocolate. Add half of the dry ingredients (with the cocoa powder) to the chocolate batter bowl and mix on medium low speed until well blended.
- Stream in 1/2 cup whole milk and mix on medium low speed until well blended. Follow with the remaining dry ingredients (with the cocoa powder) and the melted chocolate. Decrease the mixer speed to low and mix until the flour is mostly mixed in. Shut off the mixer and use a spatula to fold the chocolate batter a few times and gently finish mixing.
Bake the cake:
- Scrape the chocolate batter onto one side of the sheet pan and the vanilla onto the opposite side, using the line you drew before as a reference. The batter is thicker and doesn’t run easily, so you’ll have time to gently spread each flavor into place and smooth the surface.
- Carefully load the sheet pan into the oven and bake for 20-22 minutes, rotating the pan midway through baking. You can skip rotating the pan if your oven bakes evenly, but if your oven has hot spots, I highly recommend turning the cake for a better result.
- The cake is done if it springs back slowly when pressed with your finger. Carefully remove the cake from the oven and allow it to cool completely before frosting.
Make the vanilla frosting:
- Combine the 1/2 cup butter, 2 cups powdered sugar, 1/2 tsp salt, 2 tsp vanilla extract, and 2 TB heavy cream in a large mixing bowl. Using an electric hand mixer and beaters, beat the mixture on medium low speed until the butter has mostly soaked up the dry sugar, then increase the speed to medium and continue mixing for about 15 seconds. The frosting should be smooth, don’t overbeat, or you’ll get a lot of air bubbles.
- Use the vanilla frosting to evenly cover one long half of the sheet cake, making a “cross” with the center line that was made by the cake flavors meeting together. The frosting half should be perpendicular to the cake half. See visual aids in post for more help.
- Scrape out the bowl and beater(s) well, and use them to make the chocolate frosting. No need to wash dishes at this point!
Make the chocolate frosting and finish the cake:
- In the bowl that you used for the vanilla frosting, combine 1/2 cup butter, 2 cups powdered sugar, 2/3 cup cocoa powder, 1/4 tsp salt, 1/3 cup heavy cream and 2 tsp vanilla extract. Beat on medium low speed until the butter has soaked up the sugar and cocoa, then increase the speed to medium and beat for about 30 seconds. The mixture will lighten a bit and become creamy.
- Spread the chocolate frosting onto the other long half of the cake, right beside the vanilla. Decorate with sprinkles as desired and serve! Cake can also be chilled to harden the chocolate frosting before serving, it’s your choice.
- Leftover iced cake will keep in the fridge for about a week. Freeze indefinitely.


Nutrition
- Serving Size: 1 square of cake and frosting
- Calories: 531
- Sugar: 42.7 g
- Sodium: 239.6 mg
- Fat: 31.4 g
- Saturated Fat: 15.3 g
- Trans Fat: 0.2 g
- Carbohydrates: 60.5 g
- Fiber: 2.2 g
- Protein: 6 g
- Cholesterol: 91.6 mg